Introduction
Writing SharePoint Web Parts is one of the best ways to customize the SharePoint platform. Web Parts combine the power of ASP.NET with the flexibility of Web Part Pages. This article is intended to help you get going quickly with Web Part development.
We briefly cover four topics in Web Part development:
Background
Knowledge of SharePoint, ASP.NET and Visual Studio is required.
Creating the Visual Studio SharePoint development environment
In this section the steps to setup your development are covered. If you already have a working dev environment then you can safely skip this section.
In order to follow these steps you will need Visual Studio 2005 (.NET 2.0) or later. You will also need network access to a Windows 2003/8 server with SharePoint 2007 (WSS or MOSS) - SharePoint does not run on XP or Vista. I usually use a Windows 2003 Virtual PC with .NET 3.5 and Windows SharePoint Services 3.0. One can also install Visual Studio 2005/8 on the development server.
We assume you have administration rights on your SharePoint server and also administration rights in your target SharePoint web application.
The steps to setting up your Visual Studio Web Part development environment are as follows:
- In Visual Studio, create a new class library
- Add a reference to
System.Web

- In this step we create a simple Web Part that prints "Hello World!" to the screen. A Web Part is a class that inherits from the
WebPart class in System.Web.UI.WebControls.WebParts. In order to control the rendering of the Web Part one overrides the Render method. An HtmlTextWriter instance is passed into the Render method and can then be used to write markup to the page output. The code below is an example of this:
using System;
using System.Collections.Generic;
using System.Text;

using System.Web;
using System.Web.UI;
using System.Web.UI.WebControls;
using System.Web.UI.WebControls.WebParts;

namespace ExampleWebPartLibrary
{
    public class MyWebPart : WebPart
    {

        protected override void Render(HtmlTextWriter writer)
        {
            writer.Write("Hello World!");
        }

    }
}
- Using Visual Studio or another suitable tool, give your class library a strong name key and get the full name of your assembly. You can get the fullname by using "gacutil /l" in the Visual Studio Command Prompt or by using Lutz Roeder's .NET reflector.
- In your class library properties, set the build output path to the bin directory of your SharePoint development web application. I usually share the directory on my development server as "\\SharePointDev\wss_bin" and use this directory as my build output directory. In Windows SharePoint Services 3.0 the bin directory is usually of the form "C:\Inetpub\wwwroot\wss\VirtualDirectories\[Port Num]\bin" and I share this directory as "wss_bin".
- Add the code statements
using System.Security; and [assembly: AllowPartiallyTrustedCallers] to your AssemblyInfo.cs file. - Ensure that your class library builds and that Visual Studio places the DLL in the expected location on the server
- In the web.config file on your target server, you need to add the assembly as a safe control. You can copy one of the existing safe control entries and fill that in with the details of your assembly. You will need the full name of the assembly to complete this step.
<SafeControl
    Assembly="ExampleWebPartLibrary, Version=1.0.0.0, Culture=neutral, PublicKeyToken=db485f68ad2dc0c5"
    Namespace="ExampleWebPartLibrary"
    TypeName="*" Safe="True" AllowRemoteDesigner="True" />
- You can now add the web part library to your SharePoint site. To do this, log in as an administrator and go to the settings page. Click on "Web Part Gallery" under the "Galleries" section. Click "New" and you should see your web part in a list. Select your web part and click "populate gallery".
- You can give your web part a friendly title and control its permissions using the edit button in the web part gallery. I have chosen to call the Web Part "My Web Part".
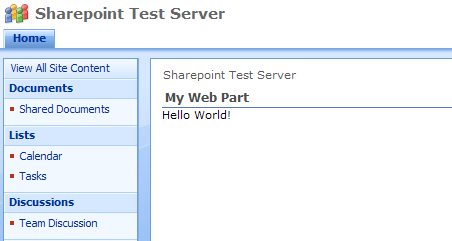
- Finally you can add the web part to a web part page and you should see the web part's hard coded "Hello World!" message.
If your build target is set to the SharePoint bin directory as per step 5 in the list above, then you won't have to redeploy when you want to test changes. Each time the class library is rebuilt, you can test the latest version of your Web Part by refreshing your Web Part page.
You also do not need to repeat the above steps whenever you add a new web part to the library. Each time you add a new web part to the library you simply need to "Populate Gallery" with your new web part.
Remote debugging can be used to debug the Web Part. We won't go into that here; the MSDN library has an article about this.
Using ASP.NET controls in your web part
In Web Part development you don't have the luxury of Visual Studio's code generation for ASP.NET. You have to declare, initialise, configure and render the controls yourself in the correct phases of the Web Part life cycle. In this example we will create a button and a label and use the button press event to change the label text.
Controls should be declared as member variables and then initialised and configured within an override of the CreateChildControls method. I usually create a separate method to setup each control and then invoke that method from CreateChildControls. It is important to add the created controls to the list of Web Part controls. If a control is not added to this list then it's events won't be raised on post back.
private Button btnDemo;
private void createBtnDemo()
{
btnDemo = new Button();
btnDemo.Text = "Click me";
btnDemo.Click += new EventHandler(btnDemo_Click);
Controls.Add(btnDemo);
}
protected override void CreateChildControls()
{
base.CreateChildControls();
createBtnDemo();
createLblHelloWorld();
}
The controls are rendered inside the Render method override. This method can be used to layout the web part it's controls. The HtmlTextWriter has many useful methods to help out, including WriteBreak() which writes a "<br />".
protected override void Render(HtmlTextWriter writer)
{
    writer.WriteBreak();

    lblHelloWorld.RenderControl(writer);

    writer.WriteBreak();
    writer.WriteBreak();

    btnDemo.RenderControl(writer);
}
Note: A known work around to the problem of not having Visual Studio support for Web Part development is to embed UserControls in the Web Part. You can read about that in
this Code Project article.
Accessing SharePoint data in your web part
There are two steps you need to take in order to access SharePoint data from within your web part. The first is to reference Microsoft.SharePoint.dll. You can get a copy of this DLL from your SharePoint server by browsing to the directory "[Program Files]\Common Files\Microsoft Shared\web server extensions\12\ISAPI".
The second step is to take care of the code access security for your web part. The easiest way of doing this is to set the target SharePoint site's trust level to "Full". This level of trust is generally acceptable in an Intranet environment. If you require that the SharePoint site be run in a minimal or medium trust level environment then you will need to configure your code access security manually.
To take the easy way out and set the site trust level to "Full" find the following in your site's web.config file:
<trust level="WSS_Minimal" originUrl="" />
Now change this to:
<trust level="Full" originUrl="" />
Now you can write some code to access SharePoint data. This is just a question of learning and understanding the SharePoint API, which is worthy of several articles in its own right. Here I show a simple web part that displays the name of the presently logged in user:
using System.Web.UI.WebControls.WebParts;
using Microsoft.SharePoint;
namespace ExampleWebPartLibrary
{
public class HelloUser : WebPart
{
protected override void Render(System.Web.UI.HtmlTextWriter writer)
{
SPWeb currentWeb = SPContext.Current.Web;
writer.Write("Hello " + currentWeb.CurrentUser.LoginName);
}
}
}
SPContext.Current.Web is the starting point for accessing SharePoint data. For example you can use it to access data in lists and document libraries.
Using SharePoint settings to manage your Web Part
Web Parts will invariably need settings in order to be useful. There are two ways of providing your web parts with settings in run time. In a bespoke environment it may be acceptable to place the settings in the web.config and access them in the same way as you would for standard ASP.NET applications. However if you require that users be able to easily configure and manage the web part themselves, then you need to use the SharePoint API to give the web part settings. This will almost certainly be the case if you are an Independent Software Vendor making a packaged release of your Web Part.
Fortunately it's quite easy to settings-enable your web part. The following steps assume you are starting with an existing web part, but you can skip to the listing at the end of the article if you are starting from scratch.
- Add the required using statements
using System;

using System.ComponentModel;
using System.Runtime.InteropServices;
using System.Xml.Serialization;

using Microsoft.SharePoint;
using Microsoft.SharePoint.WebPartPages;
- Change your web part to inherit from the
Microsoft.SharePoint.WebPartPages.WebPart - Create a new guid for your web part. Add the
Guid and XmlRoot attributes to your Web Part as follows:
[Guid("692b5ada-2f4c-45b0-b9a5-e718db958ae6")]
[XmlRoot(Namespace = "ExampleWebPartLibrarySettingsDemo")]
public class SettingsDemo : Microsoft.SharePoint.WebPartPages.WebPart
- Add the different attributes applied to the property that is used as a setting. Adjust the constant string attribute arguments according to your needs.
private string mySetting;
[Browsable(true),
Category("Example Web Parts"),
DefaultValue("Default"),
WebPartStorage(Storage.Shared),
FriendlyName("MySetting"),
Description("An example setting")]
public string MySetting
{
get { return mySetting; }
set { mySetting = value; }
}
- Using the setting in code (in this case, the render method).
The complete code listing is as follows:
using System;
using System.ComponentModel;
using System.Runtime.InteropServices;
using System.Xml.Serialization;
using Microsoft.SharePoint;
using Microsoft.SharePoint.WebPartPages;
namespace ExampleWebPartLibrary
{
[Guid("692b5ada-2f4c-45b0-b9a5-e718db958ae6")]
[XmlRoot(Namespace = "ExampleWebPartLibrarySettingsDemo")]
public class SettingsDemo : Microsoft.SharePoint.WebPartPages.WebPart
{
private string mySetting;
[Browsable(true),
Category("Example Web Parts"),
DefaultValue("Default"),
WebPartStorage(Storage.Shared),
FriendlyName("MySetting"),
Description("An example setting")]
public string MySetting
{
get { return mySetting; }
set { mySetting = value; }
}
protected override void Render(System.Web.UI.HtmlTextWriter writer)
{
writer.Write("Value of MySetting: ");
writer.Write(mySetting);
}
}
}
Further reading
This member doesn't quite have enough reputation to be able to display their biography and homepage.


