Abstract
One of the new features in MOSS 2007 is Custom Forms Authentication. SharePoint 2007 (Microsoft Office SharePoint Server 2007 or MOSS 2007) is already being deployed in hosted environments in extranet and internet roles. In either role, when dealing with authenticating users combined with hosting multiple companies on a single platform, you must consider MOSS's architecture for authentication. The Solution here highlights how Forms Authentication is enabled in Microsoft Office SharePoint Server 2007.
Introduction
Forms Authentication in General uses an authentication ticket that is created when a user logs on to a site, and then it tracks the user throughout the site. The Forms Authentication ticket is usually contained inside a cookie. However, ASP.NET 2.0 supports Forms Authentication without cookies, which results in the ticket being passed in a query string. Forms Authentication processing is handled by the FormsAuthenticationModule class, which is an HTTP module that participates in the regular ASP.NET page-processing cycle.
Authentication occurs through ASP.NET 2.0 Providers, of which there are two that come of the box for Active Directory and SQL Server. As with ASP.NET 2.0, MOSS can take advantage of custom Providers to provide authentication services from any user data store. MOSS's architecture ties a Provider to a web application within IIS. MOSS 2007 supports the following authentication types:
Windows
Forms
- SQL Membership Provider
- Active Directory Forms Provider
- Lightweight Directory Access Protocol (LDAP) Forms Provider
- Custom Provider
Web Single Sign-on
- Active Directory Federation Services (ADFS)
System Requirements
To execute the functionality for this article you should have
- Microsoft Office SharePoint Server
Office SharePoint Server 2007 runs on Windows Server 2003 with SP1 or later. We recommend that you apply all critical updates. You can use the following Windows Server 2003 editions:
- Windows Server 2003, Standard Edition
- Windows Server 2003, Enterprise Edition
- Windows Server 2003, Datacenter Edition
- Windows Server 2003, Web Edition
You have more options when you set up your SharePoint in your server.
The Solution here highlights how Forms Authentication is enabled in Microsoft Office SharePoint Server 2007.
Enabling Custom Authentication in MOSS 2007
Enabling custom authentication in MOSS 2007 requires that careful steps are followed in the MOSS server configuration files. Here in the following steps:
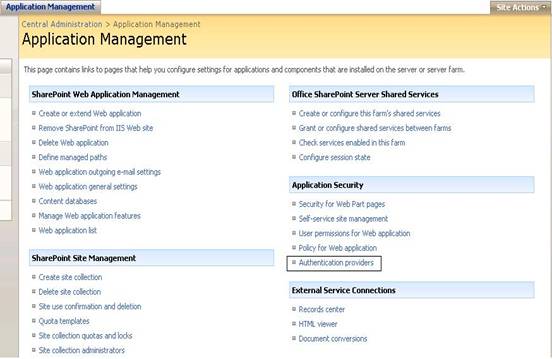
Open your SharePoint central administrator 3.0; select the Application Management tab, under the Application Security section click on the Authentication providers.
After entering through the authentication providers, you can find the authentication providers list.

Now select your web application for which you want to change the authentication mode to Custom Forms Authentication. Now click on the zone which is hyperlinked, that will redirect you to the authentication edit mode screen, where you can change the authentication mode to forms authentication.
In the above screen clip you can see Authentication Types. Under that select the Forms, this will reload the screen and shows the options for Forms Authentication. Now you need to fill the Membership provider name text box with your custom membership provider. Here I'm going to use the AspNetSqlMembershipProvider for this demonstration. Enter the AspNetSqlMembershipProvider as Membership provider name in the authentication edit mode page and hit the save button.
There are two ways to install the application services database for SQL Server. One simple way is as follows.
Step 1: Open your command prompt and run the following command.
Select Start > All Programs > Microsoft Visual Studio 2005 > Visual Studio Tools > Visual Studio 2005 Command Prompt.
Step 2: Enter:
aspnet_regsql.exe -E -A all -S
localhost\DatabaseServerName
Wait while features are added to the local SQL database.
Another way is installing the Database using Aspnet_regsql.exe, ASP.NET includes a tool for installing the SQL Server database used by the SQL Server providers, named Aspnet_regsql.exe. The Aspnet_regsql.exe tool is located in the drive: \WINDOWS\Microsoft.NET\Framework\versionNumber folder on your Web server. Aspnet_regsql.exe is used to both create the SQL Server database and add or remove options from an existing database.
Step 1: Open the aspnet_regsql.exe from the following location C:\WINDOWS\Microsoft.NET\Framework\v2.0.50727
Step 2: Now run the aspnet_regsql.exe in the server to configure or map the database.
In the database dropdown you choose your own database, if you use the default option it will use aspnetdb database (if it exists) or it will create aspnetdb and use it.
Now we need to add users to the membership provider to which you assigned the forms authentication. We have two options to add users to our membership provider. One is via SQL Script and other one is by creating a Web Application. First let's start with the SQL Script option:
Step 1:
Run the following query in Microsoft SQL Management Studio against the aspnetdb database.
declare @now datetime
set @now= GETDATE()
exec aspnet_Membership_CreateUser 'appName','userid','password',
    '','email@somewhere.com','','',1,@now,@now,0,0,null
The next option is creating via a web application.
Step 1: Create a new web application using your Visual Studio 2005.
Step 2: Add a web.config file to your newly created web application.
Step 3: Now add the connection string to your web.config file, under the <configuration> tag
Step 4: Now select Website ASP.NET Web Configuration in your Visual Studio 2005.
Step 5: Navigate through security tab, now you can view the three blocks Users, Roles, Access Rules. Under the Users block you can see Select authentication type hyper linked, click on the link to select the authentication type.
Step 6: Now you will get two options for your site access from Internet and from Local Network. You must select the From Internet option and click on the button done.
Step 7: Under the users block you can see two more hyper links. One is Create user and another one is Manage users. Create user is to create new, or add new users to your membership provider. Manage users is to delete or edit the created users in the membership provider.
After completing all the previous processes completely without any errors, now we need to do some configuration changes in the MOSS 2007 web.config files, navigate through the following path in your drive: \WINDOWS\Microsoft.NET\Framework\v2.0.50727\CONFIG and open your machine.config in Notepad or Visual Studio. You can find the <system.web> tag, under the tag <membership>, <profile> and <roleManager> copy all those tag elements.
First select the web application for which you have changed the authentication mode to forms authentication. Open the web.config file located in the C:\Inetpub\wwwroot\wss\VirtualDirectories\ folder. To determine the exact location, open IIS and check the home directory of the SharePoint site. And make backup copy of your web applications web.config file, and open the original one in your editor. Add the connection string in your web application web.config file as you entered in the sample web application.
Now we need to add the role, membership and others in your web applications configuration.
And save the configuration file and close it.
Follow the Configuration Change in Your Website process for the central administrator's web.config file.
Open your Central Administrator and click on the application management tab, under the SharePoint Site Management click on the Site collection administrators.
In the site collection list select the site in which you have enabled the forms authentication and configuration changes for Forms Authentication. And add the primary site collection administrator and secondary site collection administrator; this will get the users from the aspnetdb which you assigned for forms authentication.
The users from the membership provider will be listed as above.
Open your central administrator of your MOSS 2007 and select the Application Management tab. Under the Application Security select Policy for Web application after selecting just click on the add user button and proceed through the navigation and Choose Users you want to add and set rights for them in the process.
Another way is login with your site administrator, Select Site Actions, then Site Settings, then People and Groups. Select the New button to add a user to the site. This will also work.
Conclusion
The above procedure will enable the custom forms authentication in the MOSS 2007, which is one of the important features that available in Microsoft Office SharePoint Server.
Related Links
This member has not yet provided a Biography. Assume it's interesting and varied, and probably something to do with programming.


