Introduction
The purpose of this document is to provide the step by step information about enabling the Form Based Authentication (FBA) for MOSS 2007 site. MOSS 2007 sites uses windows authentication by default. But some business needs form based authentication to fulfill the requirements.
Below section explains to enable Form Authentication for MOSS 2007 site.
This section explains creation of database which is used to store user's information such as credentials and roles which is used for Form Authentication. This section also explains the configuration of Membership and Role providers in the web.config file and creation of users using ASP.Net configuration wizard. This article shows creating a user and which will be used for testing Form Authentication later.
Create Database
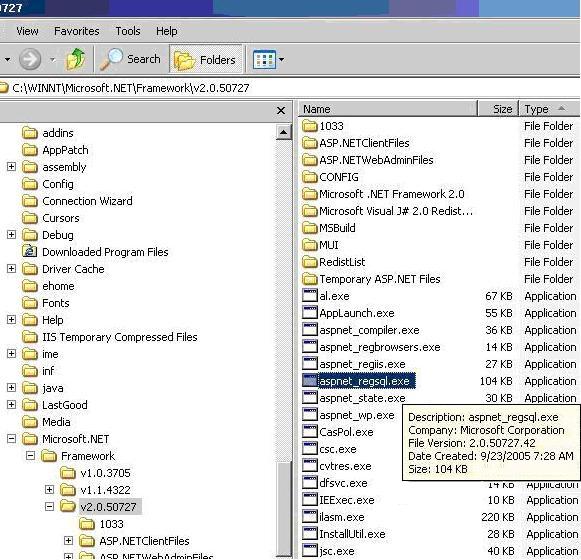
To create database, Microsoft has provided a tool/ utility called aspnet_regsql.exe that creates a database for us. This utility can be found in %windir%\Microsoft.Net\Framework\vx.x.xxxxx folder. Please see the image below:
Executing aspnet_regsql.exe file will open ASP.Net SQL Setup wizard that will walk through creating the ASP.Net 2.0 database. I have added the database name as FBAASPNetDb and configured it for windows authentication. Please see the image below:

Click on Next button. Please see the image below:
Select Configure SQL Server for application services option and click Next button. Please see the image below:
Click Next button. Now the database FBAASPNetDb is created successfully. Please see the image below:
Configure Membership and Role Providers
In the previous section, database is created successfully. Now we need to add a user in to database. Using ASP.Net Configuration Wizard, users can be added the database. This can be achieved by creating web site that will allow us to add the users and roles and also ensure the database connection strings, membership and role providers are correctly configured before we bring Sharepoint in to equation.
Below steps explains creating web site and configuring membership and role providers and executing ASP.Net Configuration Wizard.
a) Open Visual Studio 2005 and select File à New à Web Site. In the New Web Site dialog, select the ASP.Net Web Site template and enter the location to store the web site files. Please see the image below:
In the above image, location shows Z:\Inetpub\FBA. This is because Sharepoint server root directory is mapped to my system as Visual Studio 2005 is not installed in server machine. You can choose any location whichever is comfortable for you.
b) Add a new web.config file to web site project. Please see the image below:
c) By default, you will see a <connectionStrings/> node within <configuration> node. Specify the connection string to the database which has been created in the previous section. Please see the image below:
I have mentioned server as EC4-NETP-148429. This is the server in which SQL Server 2005 is installed. Please mention the respective server name.
d) After setting up the connection string, we need to specify the membership and role providers in the web.config file. In this article, I am using ASP.Net SQL Membership and Role providers. So specify the provider's information within the <system.web> tag. Please see the image below:
One thing we need to make sure that is, the provider name and connection string attribute specified in the web.config file should not be same as specified in the machine.config file. When we install .Net Framework 2.0, default connection string and providers are specified in the machine.config file.
e) Save web.config file and launch the ASP.Net Configuration Wizard by clicking on Website à ASP.Net Configuration. Please see the image below:
f) Set the authentication type in the above wizard. To do this, click Security link. In the Security tab, under Users section, click Select authentication type link. Select From the internet option and press Done button which is available in the bottom right corner. By selecting this option, which means that site will use form authentication to identify users. Please see the image below:
g) To test the membership and role providers, click on Provider tab. In the Provider tab, click on Select a different provider for each feature (advanced) link. Select right / correct membership and role provider and click Test link to ensure that providers are communicating to right database. Please see the image below:
At this point, we configured web.config file with connection string and providers information. Also we tested the providers with the database. Next section will explain adding users to database.
Create a User
a) To add users, click on Security tab. In Security tab, under Users section, click Create user link. Here I am adding user as testFBA and password as password which will be used for testing form authentication later. Please see the image below:
Now we have created a user successfully. Do not worry about creating roles at this time and will be explained later.
This section explains creating web application using Sharepoint Central Administration. In this article I am creating two IIS web sites; one is extranet site which will be used by the content owners and configured to windows authentication. Another site is internet site specifically for internet users and configured to form authentication. Below section explains creating of two sites.
Creating extranet IIS Web site
Before creating new site, we need to create new web application. Below is the step by step information for creating new web application.
a) Click Start à All Programs à Microsoft Office Server à Central Administration.
b) In the Application Management tab, under Sharepoint Web Application Management section, click Crate or extend Web application link.
c) In Create or Extend Web Application page, click Create a new Web Application link. Provide the information to create new web application and click OK button. Please see the image below.
d) Create site under the above web application. To do this, in Application Management tab, under Sharepoint Site Management section, click Create site collection link.
e) In Create Site Collection page, select the web application which have been created in the previous step and provide other information to crate the site and click OK button. Please see the image below.
Now we created the web application and site successfully. Next section explains creating internet site.
Creating internet IIS Web site
This section explains extend our web application to another internet site which has been created in the previous sections. This site is for anonymous or internet users.
a) Click Start à All Programs à Microsoft Office Server à Central Administration.
b) In the Application Management tab, under Sharepoint Web Application Management section, click Crate or extend Web application link.
c) In Create or Extend Web Application page, click Extend an existing Web application link. Provide the information to extend the web application and click OK button. Please see the image below.
Now we have successfully created extranet and internet site. Below is the URL for these sites.
For extranet site: http://ec4-netp-148429:4040
For internet site: http://ec4-netp-148429:4041
Open the browser and test both the site by typing the URL. But these two sites are asking about windows authentication because these sites are not yet configured to form authentication.
Below section explains configuration of web.config file of each site with connection string and providers information.
In this section, we are modifying the web.config file of two sites. Web.config file resides in the root directory of the site i.e. c:\Inetpub\wwwroot\wss\Virtual Directories. Under this, two folders i.e. 4040 and 4041 are available. Web.config file of specific site is available inside these folders.
Configure web.config file of extranet site
The web.config file of extranet site is available in c:\Inetpub\wwwroot\wss\VirtualDirectories\4040 folder.
a) Open web.config file, specify the <connectionStrings> node defined in the section 2.2.c just after the closing </SharePoint> tag and opening <system.web> tag. Please see the image below:
b) Add the membership and role provider node which is defined in the section 2.2.d, just after opening the <system.web> tag. Please see the image below:
c) Save the web.config file.
Configure web.config file of internet site
The web.config file of internet site is available in c:\Inetpub\wwwroot\wss\VirtualDirectories\4041 folder.
a) Open the web.config file and follow the same step specified in the Section 4.1
Configure SharePoint Central Administration
The web.config file of Central Administration site is available in c:\Inetpub\wwwroot\wss\VirtualDirectories\13035 folder. To find the virtual directory open IIS. Under Web Site folder, find Sharepoint Central Administration v3. Right click to open properties. In the Properties pop up, click Home Directory tab and find the Local Path.
a) Open the web.config file and follow the same step specified in the Section 4.1
b) Here we need to very careful while specifying defaultProvider information for Role Provider. In the Role Manager attribute, add AspNetWindowsTokenRoleProvider as defaultProvider. This is necessary because Central Administration still uses Windows Authentication for the role provider. Please see the image below:
c) Save the web.config file.
Enabling Form Authentication to internet site using Central Administration is very simple. Below steps explains the enabling form authentication.
a) Browse to Central Administration web site. Select Application Management Tab.
b) In the Application Management Tab, under Application Security section, click on Authentication Providers link. Please see the image below:
c) Select the Extranet Web Application. You could see Default and Internet zone for the extranet web application. In this we are configuring form authentication for Internet application. Please see the image below:
d) Click on Internet zone option. Edit Authentication page will open. Select Authentication Type as Forms. Check the enable anonymous access check box and provide membership and role manager name. After providing the information, click on Save button. Please see the image below:
Now we successfully enabled the form authentication for the internet site. To prove form authentication is actually working with our data store, we need to add the user to the site. Below step explains to adding user to site.
e) Browse to extranet web site. In our case it is http://ec4-netp-148429:4040
f) Click Site Actions à Site Settings à People And Groups. Please see the image below:
g) Click on New à Add User.
h) In the Add User page, enter user name as testFBA which we created in the previous steps and provide the permission for the user. Please see the image below:
Now we created a user and granted the permission successfully. Below steps explains testing form authentication.
i) To test Form Authentication, Browse the internet site. In our case it is http://ec4-netp-148429:4041
j) Now system will redirect to Sign In page. Please see the image below:
k) Enter testFBA as user name and password as password and click on Sign In button. Please see the image below:
Now we successfully log in into internet site with form authentication.
Author
Nagendra Gunaga is having 5.8 years of experience in IT industry. His experience is in .Net Framework, C#.Net, ADO.Net, ASP.Net, SQL Server and Microsoft Office SharePoint Server.
This member doesn't quite have enough reputation to be able to display their biography and homepage.


