Microsoft Windows SharePoint services (aka WSS) and Microsoft Office SharePoint Server 2007, are two magnificent technologies in the current web programming world.
Microsoft defined the former one as
Built on Microsoft Windows Server 2003, Windows SharePoint Services also provides a foundation platform for building Web-based business applications that can flex and scale easily to meet the changing and growing needs of your business Built on Microsoft Windows Server 2003, Windows SharePoint Services also provides a foundation platform for building Web-based business applications that can flex and scale easily to meet the changing and growing needs of your business. A versatile technology in Windows Server provides the infrastructure for collaboration and a foundation for building Web-based applications.
And defined the later one as
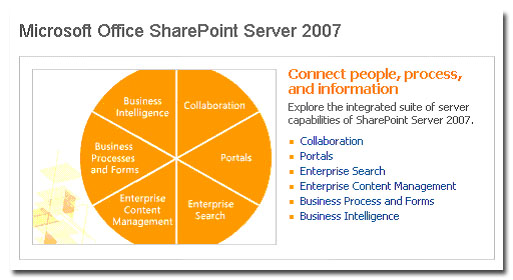
Microsoft Office SharePoint server 2007 provides portal and search features that represent the next generation of Microsoft Office SharePoint portal server 2003. However, Office SharePoint server 2007 is much more than that. The office team has made significant investments in many other areas to give office SharePoint server 2007 extra dimensions in Web Content Management, business intelligence, business process management and enterprise content management.
Here is an architectural structure of these two

Using these two elegant technologies together developers can create intuitive web portal that can meet almost any kind of business requirement. A rich collection of web portal building blocks are available out of the box provided along these distributions. Therefore, in order to meet a business requirement or to automate a business process of any enterprise scale establishment developers need to do only modifications on existing features and significantly *less* development stuffs indeed.
SharePoint server provides basic set of site templates that can be used to meet almost al general purpose web site these days. Besides these built in site templates one can customize a site (as much as you want) and can save that customized site as a template for future use- which can add tremendous value to enterprise business.
Since the middle of last year I was involved in a project which was built on these technologies. And from the experience that I experienced during the development of that project inspired me to share the ideas with all other developers- invite all to have an eye on these technologies. One thing I must say here, I am not going to write any thing here which is uniquely created or invented by me. Almost all the stuffs you can learn from other web resources as well. But my objective was to accommodate them (as much as I explored) in a single page to ensure ease of reading.
In this article, I am going to explain the basics, a little bit advanced too and of course some tricks and tips that I ever discovered/learned during my experience.
An office SharePoint portal site is a Windows SharePoint services site collection containing a top level site and several child sites (aka sub sites) underneath it.
Here is an exception that needs to mention - unlike SharePoint portal server 2003, a portal site does not have to be created at the root of the IIS web site. This brings more flexibility – now we can host hundreds of portal sites inside a single IIS web site.
In Windows SharePoint services terminology and IIS website extended with Windows SharePoint services functionality is known as a web application.
In general, all the features that one can expect from a portal solution are available in Office SharePoint server 2007. For example, Personal sites, audience targeting, user profiles and managements, search, single sign on (SSO) and others are beautifully integrated along with some new Office SharePoint 2007 features like Business data catalog.
Shared Service Providers (aka SSP) is a core part of Office SharePoint portal architecture which consist a set of services that can be configured at a single time and can be shared among many different Office SharePoint server 2007 portal sites and windows SharePoint services sites.
SharePoint services provides a rich set of APIs –which is basically SharePoint object model, can be used to manipulate any SharePoint site elements – like list, documents and in fact the site it self too. This entirely a managed language API set wrapped the unmanaged stuffs underneath it. In this article you will find some uses of these APIs as code snippet – as needed.
There are three ways you can create and perform management tasks on a portal site.
- Using the Windows SharePoint services central Administration application
- Using a command line utility that comes with SharePoint distribution named STSADM.EXE
- Programmatically by means of From custom code
There are several portal site templates that ships with an Office SharePoint server 2007 distribution that can be used to create a portal site. Some examples of site templates that can be used to create a new Office SharePoint site 2007 portal site are as follows
- Corporate Internet site
- Internet presence web site
- Publishing site
One can add custom site templates as well. The office team has provided new site templates to create child sites with in a portal site collection such as Report center, search center. The office team has also evolved the old SharePoint server 2003 site templates like News, Topics and site directory.
If we want to create a portal site from the scratch then first of all we need to create a new web application. Creating a new web application and creating site collections, top level sites can be done from the SharePoint central administration application.
Let's open the SharePoint 3.0 central administration application from the start menu and Navigate to the application management page (a link is there at the top of the page) and here we will see a link like create/extend web application-which is basically used to create or extend a web application.
Clicking on this link will bring a page where we can create a new web application.
After filling up the data that are required to create a new web application we will have a link called site collection. This is the link that will create a site collection inside this newly created web application. So we have a top level site here. Now we can start developing on this top level site or even we can create sub sites/child sites underneath of this site.
For this demo I am using the Team site template for creating sites. Of course you can use other templates as well which fits your requirements. Basically team site is most general one that can mitigate almost all the basic business portal's needs.
At the top of a SharePoint portal site is called as Top level site-which is basically the site collection. From this top level site one can create child sites/sub sites to manage collaboration of different department/group of people. Each sub sites manages a separate set of lists, document libraries. Therefore clean and separate data collaboration can be achieved thru these site hierarchies.
We can define user and group for a site along with the privilege for a site. For example you can create separate group of people for each sub sites. And one sub site user will not have any privilege to access or view contents of another sub sites. One thing we need to keep in mind that if we want to create separate set of user for each sub sites then during creation of the sub site we need to use unique permission option where the default sets to use same permission as parent.
All SharePoint users are represented by a Class SPUser (part of SharePoint object model) by means of which we can programmatically interact with SharePoint site users.
SPWeb web = SPControl.GetContextWeb(HttpContext.Current);
foreach (SPUser siteUser in web.SiteUsers)
{
Logger.WriteLine(siteUser.LoginName);
}
Web part is some sort fundamental building block in a SharePoint portal. Web parts can contain information-with which user can interact, and provides personalization persistency. So a user can design the layout of his page with web parts (designed on web part zones) and it would be stored into the SharePoint content database so that user will find the layout when he/she will login next time. SharePoint ships with a bunch of built-in web parts that can add magnificent values to the development effort. I am not going to explain how we can build a web part here in this article. Because I guess Tony Rabun has already explained this in his beautiful article. I would like to request you to take a look on that article if you need to learn it right now.
Anyway, in this web era, just creating a web part that has some web controls-is not sufficient for us. We need to enable these controls to perform operations with out postbacks too. Using ASP.NET AJAX can play the role here. But enabling Ajax into a SharePoint web part, is not that easy like dragging an UpdatePanel onto the web user control (*ascx). We need to consider the fact that UpdatePanel need a script manager which should be present into the ASP.NET page. In SharePoint development all the pages are create by the SharePoint itself and remains into the content database. So we need to explicitly check if the page –where we need to display our web part, has a ScriptManager or not. If not then we need to create one explicitly. Again, I am not going into the details of this too. We can take a look on this process from Mahdi Abdulhamid's article. In fact, another good resource is Jan Tielen's blog and the GodDotNet work space for SmartPart.
Most of the time what we miss during developing the web part is forgetting about the design time view of the web part. Therefore, whenever some one will going to design the web part from SharePoint designer 2007 then it fails to display any UI rather then an error says like "Preview for this web part is not available". We can get rid of this problem with such a simple solution. We need to implement the
Microsoft.SharePoint.WebControls.IDesignTimeHtmlProvider interface exposing a single method, GetDesignTimeHtml, which returns the static HTML shown from within the SharePoint Designer editor. As you already can see, we can return a meaning full html content as a return value from the implemented method. Just keep in mind that you don't have to write any head or body html element. You can start with a div or table to generate this html block.
public class CustomWebpart :
Microsoft.SharePoint.WebPartPages.WebPart,
Microsoft.SharePoint.WebPartControls.IDesignTimeHtmlProvider
{
public string GetDesignTimeHtml()
{
return @"<div style='border: black
1px solid; background-color: yellow'>
This is design time view...</div>";
}
SharePoint list can be used to preserve and manipulate any data that can be organized in a list format. Basically it's a general purpose list data structure that can be customized to manipulate any custom data. We can create a list and then we have the opportunity to populate the columns for the list. We can keep attachments along with a list item. We can define privilege for a list and in fact for an individual list items. And of course we can do all these operation programmatically too.
There are two things that need to be exploring before starting work with SharePoint list.
Content type is basically the schema definition of a site or list. For example, if we need a list that will be used to keep track of project progress then the content type for this should include the columns like Project, task, responsibility, status etc. Content types provide the means to encapsulate a data schema and make it independent of a location on a SharePoint site. Because content types are independent of a specific list or document library, a content type can be used in lists on multiple sites, which enables the types of content stored on a site collection to be defined and managed more centrally. SharePoint ships with some out of the box content types but besides these we can create or customize an existing content type to meet our requirements. More interesting thing is we can manipulate content types programmatically too using the SharePoint object model. Some example snippets are given below.
SPWeb web =
 SPControl.GetContextWeb(HttpContext.Current);
       SPContentType contentType =
 web.ContentTypes["ProjectProgress"];
       StringCollection sc = new StringCollection();
       sc.AddRange(new string[]
 { "Initiated","On progress","Completed" });
       contentType.Fields.Add("TaskStatus",
 SPFieldType.Choice, false, true, sc);
       contentType.Fields.Add(taskField);
contentType.Update();
Site column is a column definition that can be used for multiple lists in multiple SharePoint sites. Site column has much in common with content types. Site column can be created at a site level and can be used to create lists depends on that site column definition.
We can crate custom list or document library by selecting existing content types and site columns or event we can create custom site columns and content types and later can create custom lists or document libraries based on those custom content types.
After creating a site list we can save that list as a template so that later we can create another list which has exactly the same content types and site columns present.
Now let's see how we can manipulate a list items programmatically. SharePoint lists are represents with a class named SPList. And this class exposes all the methods and properties to work with its items. Here are some code snippets that will help to get an idea about it.
All SharePoints lists are designated a unique id by which we can indentify it. Here is how we can get a list reference from a list GUID.
public static SPList GetListByID(string listID)
       {
           SPWeb web =
                SPControl.GetContextWeb(HttpContext.Current);
           SPListCollection lists = web.Lists;
           Guid guid = new Guid(listID);
           return lists[ guid];
       }
Besides this we can get a list reference using its name too.
public static SPList GetListByName(string listName)
{
    SPWeb web =
            SPControl.GetContextWeb(HttpContext.Current);
    SPListCollection lists = web.Lists;

    return lists[listName];
}
Retrieving the list items can be done as follows
public static List<String> GetListItems(string listName)
{
SPList list = GetListByName(listName);
if (null != list)
{
List<String> titles = new List<String>();
foreach (SPListItem item in list.Items)
{
titles.Add(item["Title"]);
}
return titles;
}
}
return null;
}
or,
public static List<String> GetListItems(string listName)
{
SPList list = GetListByName(listName);
if (null != list)
{
List<String> titles = new List<String>();
foreach (SPListItem item in list. GetItems())
{
titles.Add(item["Title"]);
}
return titles;
}
}
return null;
}
One most powerfull API that SPListItemCollection provides is
DataTable data = list.Items.GetDataTable();
In this case it returns an ADO.net data table using which we can easily do UI controls bindings, caching and stuff like that.
Creating a new item can be done as follows
SPListItem item = list.Items.Add();
              item["Title"] = "Title goes here";
item["Description"] = "Here is the description..";
              item.Update();
If the list's content type provides a column for keeping attachments then we can upload attachments as following
byte[]fileContent = GetFileContents();

item.Attachments.Add("SOME FILE", fileContent);
item.Update();
Downloading all existing attachments from a list item can be perform as follows
public static Dictionary<string,byte[]>
DownloadSharePointListItemAttachement(
string listName,
int itemID)
{
Dictionary<string, byte[]> attachments
= new Dictionary<string, byte[]>();
SPWeb web
= SPControl.GetContextWeb(HttpContext.Current);
SPList list = GetListByName(listName);
SPFolder folder =
web.Folders["Lists"].
SubFolders[listName].SubFolders["Attachments"].
SubFolders[itemID.ToString()];
foreach (SPFile file in folder.Files)
{
byte[] binFile = file.OpenBinary();
attachments[file.Name] = binFile;
}
return attachments;
}
We can upload documents into a document library as follows
Byte[]fileContents = GetFileContents();
SPWeb site = SPControl.GetContextWeb(Context);
SPFolder folder = site.GetFolder(folderPath);
string fileUrl = fileName;
SPFile file = folder.Files.Add(fileUrl, fileContents);
Often we need to retrieve list data in a filtered view rather fetching the entire items together. There are two beautiful things that can be used to achieve this. One is View and another is CAML
View is conceptually the same thing that we are acquainted in database context. In SharePoint a view is represent by a class named SPView using which we can view a partial or filtered data from a list item collection. We can create Views from list settings of a SharePoint site page. Programmatically we can explore all the views available with in a site as follows
SPWeb web = SPControl.GetContextWeb(this.Context);
SPList authors = web.Lists["authors"];
SPView activeAuthors = authors.Views["Active Authors"];
SPListItemCollection items = authors.GetItems(activeAuthors);
foreach ( SPListItem item in items )
{
}
This approach is acceptable in some situations; however, most of the times we need to apply dynamic filters according to the user's input. In this situation, predefined views are not much help. Instead of passing a SPView object to the GetItems method, we can pass a SPQuery object, which defines the filtering conditions and optionally the sorting options. Collaborative Application Markup Language (CAML) is the glue here. CAML define one or more filter conditions that can be used to do the filter among the list items. The following example shows how to retrieve all the Authors items whose Title field contains the word "PetZold" using CAML.
SPQuery query = new SPQuery();
query.Query = @"<Where><Contains>
<FieldRef Name='Title'/><Value Type='Text'>PetZold</Value>
</Contains></Where>";
SPListItemCollection items = authors.GetItems(query);
The structure of a simple CAML query is defined as follows.
<Where><
[Operator]> <
FieldRef Name='[FieldTitle]'/><
Value Type='[FieldType]'>[Value]
</Value>
</[Operator]>
</Where>
We can replace the [Operator] placeholder with one of the following operators:
- Eq = equal to
- Neq = not equal to
- BeginsWith = begins with
- Contains = contains
- Lt = less than
- Leq = less than or equal to
- Gt = greater than
- Geq = greater than or equal to
- IsNull = is null
- IsNotNull = is not null
We can also define a query that contains multiple OR/AND conditions. Here is how we can define a query with two OR conditions, to select all items whose Name field is equal to either "Mark" or "Joe":
<Where> <Or> <Eq><FieldRef Name='Name'/>
 <Value Type='Text'>Mark</Value></Eq> <Eq><FieldRef
 Name='Name'/><Value Type='Text'>Joe</Value></Eq> </Or>
 </Where>
A limitation of the <or>and <and>blocks is that they can contain just two conditions. If we want to have more, we have to define an <or>/ <and>section that contains an inner <or>/ <and>section in place of one of the two conditions. The following examples show how to add a further possible value for the previously described query.
<Where> <Or> <Eq><FieldRef Name='Name'/>
 <Value Type='Text'>Mark</Value></Eq> <Or> <Eq>
 <FieldRef Name='Name'/><Value Type='Text'>Joe</Value></Eq>
 <Eq><FieldRef Name='Name'/><Value Type='Text'>Linda</Value></Eq>
 </Or> </Or> </Where>
There is a cool tool to create CAML can be found at here.
SharePoint ships with a bunch of beautiful UI controls (for example date time picker control). We can use these out of the box UI controls into our web part user controls (*.ascx) to make a great and consistent look and feel UI.
Let's see how we can use the SharePoint date time picker control into a custom web part.
Let's open our user control (.ascx file) that we are rendering inside our web part. Add the following registration code block at the top of the file
<%@ Register Tagprefix="SharePointSD"
Namespace="Microsoft.SharePoint.WebControls"
Assembly="Microsoft.SharePoint, Version=12.0.0.0, Culture=neutral,
PublicKeyToken=71e9bce111e9429c" %>
This will provide a local tag prefix for the built in SharePoint date time control. Now put the following mark-up into the ascx.
<SharePointSD:DateTimeControl runat="server"
id="dtpDateTime" DateOnly="True">

<asp:TextBox runat="server" MaxLength="45"
CssClass="ms-input" ID="dtpDateTimeIdentifierTextBox">
</asp:TextBox>
</SharePointSD:DateTimeControl>
This will provide a following like UI
We can read the selected date at server side using the following snippet
DateTime selectedDate = dtpDateTime.SelectedDate;
This way we can use other lucrative controls as well to build an attractive UI. You can collect the mark-up for an UserControl using SharePoint designer. First of all desing the UI using SharePoint Designer and then copy the mark-up code and paste it into the C# user control to desinge the UI.
SharePoint web parts provide an intuitive short cut menu at the top-right corner of each web parts into a page. This menu can be used to minimize/restore, closing a web part or even connecting a web part with other web part. We can customize this context menu as per our need. We can remove some elements from the context menu or even can add our custom menu items in it.
In order to do this kind of job (modifying an existing menu item or creating one or more new menu item into the context menu) we need to override CreateWebPartMenu inside the WebPart base class.
We can create menu items that has a client side (javascript) handler or a menu item that has a handler in server side (C# or any other .NET languages).
public override void CreateWebPartMenu()
{
 SPWeb web
  = SPControl.GetContextWeb(this.Context);
 MenuItem mnuClientSideMenu
  = new MenuItem( "Menu with Javascript Handler",
  "javascript:return alert('Client side menu clicked.');");
 MenuItem mnuServerSideMenu
  = new MenuItem(
"Menu with C# Handler",
"MENUID",
new  EventHandler(mnuServerSideMenu_Click));
this.WebPartMenu.MenuItems.Insert(0,  mnuClientSideMenu);
this.WebPartMenu.MenuItems.Insert(0, mnuServerSideMenu);

}
private void mnuServerSideMenu_Click(object sender, EventArgs e)
{
 this.Text = "Server side menu clicked!";
}
The above code snippet will add two context menus as following
Now if you want to remove or disable any system provided menus (like Minimize, Close etc) then you can do that by retrieving a reference of that menu and set appropriate properties. To refer a system menu we can use some predefined ids or even the indexes. The predefined ids are as follows
- MSOMenu_Minimize
- MSOMenu_Restore
- MSOMenu_Close
- MSOMenu_Delete
- MSOMenu_Edit
- MSOMenu_Connections
- MSOMenu_Export
- MSOMenu_Help
Here is how we can disable the minimize menu
MenuItem mnuMinimize =
        this.WebPartMenu.MenuItems.ItemFromID(
          "MSOMenu_Minimize"
      );
     mnuMinimize.Enabled = false;
We can remove all menus as follows
WebPartMenu.MenuItems.Clear();
Beside this shortcut menu modification SharePoint also provides a beautiful context menu for each list items and documents in a document library. We can modify that one too. Consider the following list into the screen shot.
Here we can add a new context menu item into the dropdown menu and that can operate a custom action onto the list item. In order to do this, we need to add a Content Editor Web part into the page and we need to set the lay out of the Content Editor Web part as Hidden. Content Editor Web part is a web part that can be used to insert HTML chunk or javascript into a SharePoint page. For adding a new custom context menu item we need to edit the source of Content Editor Web part.
Clicking onto the source editor button will bring a window where we can write our custom HTML or javascripts. Now open that window and write the following javascripts
<script language="javascript">
function Custom_AddListMenuItems(m, ctx)
{
var strDisplayText = "Show Project details";
var strAction = "document.location.href=
'ProjectDetails.aspx?listID="+ctx.listName+
"&itemID="+currentItemID+"'";
var strImagePath = "/_layouts/images/edit.gif";
CAMOpt(m, strDisplayText, strAction, strImagePath);
CAMSep(m);
return false;
}
Here we are writing some utility functions
function __getSiteName()
{
var _siteName = '';
try
{
var completeUrl
= document.location.href;
var _server_index
= completeUrl.indexOf('/',7);
if ( _server_index >= 0 )
{
var _site_index
= completeUrl.indexOf('/',
_server_index + 1);
if ( _site_index >= 0 )
{
_siteName
= completeUrl.substring(_server_index + 1 ,
_site_index);
}
}
}
catch(err)
{
}
return _siteName ;
}
function __getServerUrlInitials()
{
var _hostInitial = '';
try
{
var completeUrl = document.location.href;
var _my_index = completeUrl.indexOf('/',7);
if ( _my_index >= 0 )
{
_my_index = completeUrl.indexOf('/',
_my_index + 1);
if ( _my_index >= 0 )
{
_hostInitial = completeUrl.substring(0,_my_index);
}
}
}
catch(err)
{
}
return _hostInitial;
}
function __moveToPage(targetUrl)
{
var destinationUrl = __getServerUrlInitials();
destinationUrl = destinationUrl + '/' + targetUrl;
document.location.href = destinationUrl;
}
</script>
Here we are creating a new menu item inside the Custom_AddListMenuItems function. This is a SharePoint Javascript Library defined function where we can populate new custom items. CAMOpt Actually does add a menu item into the context menu.
Right now it is just redirecting user to another page passing the list id and item no as a query string so that the destination page can display action based on the menu selection. But we can write server side event handler too. But that will need some tricks. We need to create a web part that implements ICallbackEventHandler to provide the ASP.NET call back functionality. (Please read about Callbacks if you don't know what ASP.NET callback does). We know that call back will give us a client side method –invoking which we can submit a request from client side to server side. And then we can keep the web part layout as hidden. And from the javascript menu handler we can invoke that callback client side function for submitting a request.
By default SharePoint uses the windows authentication. But in internet scenario it is more preferable to user SQL server authentication over windows authentication. Configuring SQL server authentication over windows authentication is not a difficult one. Here is how we can do that.
1. First of all we'll create a Database in SQL Server 2000/2005. For this we'll use aspnet_regsql.exe utility, which will create all the required tables, stored procedures. This utility is available in C:\WINDOWS\Microsoft.NET\Framework\v2.0.50727 directory. We'll use GUI mode to create the DB. In the command prompt, browse to that directory and write the following command:
>aspnet_regsql.exe
It will bring a popup window. Following the instructions create a users database for your SharePoint application. In my case the database name is Custom_Users. This database will store all the users' information and their roles.
2. Now we'll create a number of users and roles. There are many ways to do this, such as using API, executing SP's of our database, using ASP.NET Configuration tool in Visual Studio 2005. We'll use ASP.NET configuration tool. For this create a website in Visual Studio 2005. In its web.config file add the following connection string.
<connectionStrings>
  <remove name="LocalSqlServer" />
  <add name="LocalSqlServer"
    connectionString=
  "Data Source=SHAREPOINT\OFFICESERVERS;Initial
                Catalog=Custom_Users;Integrated Security=SSPI;" />
</connectionStrings>
Keep the connection string name LocalSqlServer as we'll use some of the default configuration from machine.config file. Now we need to enable the role manager. For this inside the <system.web>add the following:
<rolemanager enabled="true" />
Now click the ASP.NET configuration button, of the solution explorer (highilgted in the following figure).
This will pop up a browser window with the following page.
Now click the Provider Configuration link to test if your Membership Provider and Role Provider are ok. If they are ok, add users and roles going the Security page.
3. This moment you have all your roles and users created and we'll move to SharePoint 2007. For this we need configure our SP web application. We can configure it when creating the SP web application. It can also be done later. Here we'll configure an existing web application, which was previously configured with Windows Authentication. This application will hold our site collection.
In order to do this, browse the SharePoint Central Administration site. Click on the Application Management link. There under the Application Security section click on the Authentication Providers link. This will take you to the following page:
Now click the Provider Configuration link to test if your Membership Provider and Role Provider are ok. If they are ok, add users and roles going the Security page. Select your intended web application using the menu highlighted in the above figure. My application is http://sharepoint:8888/. Click on the Default link to reconfigure the provider for your application. This will take you to the following page:
Here in the Authentication Type section select Forms. If you select Forms Authentication type you will be presented with two text boxes for Membership Provider Name and Role Manager Name. Now write AspNetSqlMembershipProvider as your Membership Provider Name. For Role Manager leave the text box blank.
4. Now we need to configure the web.config files of the Sharepoint Central Administration Site and our SharePoint application. You can find them in C:\Inetpub\wwwroot\wss\VirtualDirectories\{applicationPort} directory. To each of the file add the following connection string:
<connectionStrings>
  <remove name="LocalSqlServer" />
 <add name="LocalSqlServer"
   connectionString="Data Source=SHAREPOINT\OFFICESERVERS;
  Initial Catalog=Custom_Users;
  Integrated Security=SSPI;" />
</connectionStrings>
Adding this connection string to the Central Administrator site will help us to verify the site administrator users. After adding these lines, reset your IIS.
5. This is the time to create a site collection on the SharePoint application we created/modified earlier. I've created a Team Site. When creating the site collection, specify a user, you created in SQL Server DB, as the Site Collection Administrators. You may also want to use a site collection you created sometimes earlier. To use such site collection you have change the Site Collection Administrators to your users created in SQL Server database. For this click the Site Collection Administrators link under the SharePoint Site Management section in Application Management page. In the following page select your site collection from the menu under Site Collection section. In this page specify your Site Collection Administrators. These must the users you created in the SQL Server DB earlier.
6. Now login to your site collection using users in SQL Server DB.
7. Done
It is often required for developers to copy the entire site to a new machine. Specifically after developing a SharePoint site we need to port it into a staging server and after that to deployment server as well.
Back-up and restore can be used to accomplish this kind of stuffs. Back up – restore process can copy all the site elements along with site user and all custom changes that we have made over a SharePoint site pages.
In order to taking a backup of a SharePoint site (including the content database) we need to use the STSADM. Here is the way how we can do it
In order to taking backup,
>stsadm –o backup
–url http:
–overwrite
And for the restoring
>stsadm –o restore
–url http:
–overwrite
I hope this article will help people who are developing custom solutions using Windows SharePoint Services and Office SharePoint Server 2007.
This member doesn't quite have enough reputation to be able to display their biography and homepage.


