Note: Program will only run on 64-bit OS (or one with 64-bit emulator ability)
Note: Program must be compiled in 64-bit configuration - in VS2010 go to Build - Configuration Manger... - Then set one up in 64 bit. For reason see Points of Interest at bottom.
Introduction
The application I have developed makes management of multiple MineCraft servers much easier and faster wrapping the standard input/output with user friendly command buttons while still allowing expansion and the full capability of MineCraft. The application solves the issue of learning some of the most common commands for the MineCraft server and makes editing settings more reliable too.
Background
I only recently started playing MineCraft and it quickly became apparent that the best form was playing online with my friends. This meant having a server and since I have a good internet connection and a bit of nouse when it comes to computers, I decided to set up a server. However, it I quickly got fed up of trying to remember commands and managing settings such as the white-list. I decided, therefore, that an easy-to-use management program would be the best solution and so here it is.
Using the code
The simple way to use the code is of course to download the application and start it up. The user interface should be fairly self explanatory and easy to use with controls enabling and disabling when they can/can't be used. I have also included a basic scheduler system that lets you select what time you wish the server to start at/after and what time it should stop at/after. The application lets you select which folder contains all your servers' folders and then or without this step, which folder contains the server you wish to run. It will then let you select which of the available worlds you want to start with and what port the server should run on. The port number is loaded from the server's configuration so if you want to keep it the same there is n need to change it. Final things to note are the tab paged command buttons that can be added to or removed and the command line input at the bottom that allows input of any command and input of a command to add/remove from the command buttons.
Code Structure
The code has a basic but hopefully useful structure split into three two sections:
Back-end code:
- MineCraft server class
- Server Settings class
Front-end user interface:
- Main Form
- Command Arguments Form
- Settings Form
The Classes
MineCraftServer class: This wraps up all the lowest level interaction with the MineCraft server itself (i.e. the Java application instance).
ServerSettings class: Allows easy editing/access to the major server settings files. Currently includes server.properties, ops.txt, white-list.txt and banned-players.txt. Support for other files such as banned-ips.txt could easily be added but I felt was somewhat less useful on the whole so haven't yet included. Future versions of this may.
OutputEvent.cs: Provides (very) basic event stuff for friendlier interaction with the MineCraft server output.
The Forms
Main Form: The main window that is loaded when the program starts. This does all initial loading of previous settings from the registry, allows selection of server for that instance and provides access to all the rest of the program (directly through buttons - no nasty menus, sub-menus nor windows after windows before you get to what you want.)
Command Arguments Form: Takes one argument for its constructor that allows specification of the text for the labels of the arguments the user must enter. Text boxes and labels are added dynamically based on these values. OK and cancel buttons are used and are already added to the form (not added dynamically) - dynamically hear meaning added by my own code not through IDE generated code.
Settings Form: Tab control for the different file plus a "General" tab that gives friendly controls for the main (almost all) server.properties settings (e.g. check boxes for enable PvP, Monsters etc.). Extensible and provides an "All" that allows any key/value pair (including comments where value is empty) to be added to the server.properties file - uses list box on this tab to display selectable keys.
How these work
MineCraftServer class:
The basic principle is to start up the MineCraft server in very much the same way that the launch.bat or MineCraft.exe programs would but then grab the output to display it in my program and redirect the input so my program can control it. This has been built into most console applications for a long time (so far as I can tell and at least on Windows) in the form of the StandardInput, StandardOutput and StandardError streams, the former being writeable as input, the latter two being readable output.
So, first things first, how do you start another application from C#? The answer is you use System.Diagnostics.Process and then the Start method. (I'm still looking for a satisfactory reason why this is placed under Diagnostics as it seems a bit odd - anyone know?) For this you need (or rather its preferable) to have created System.Diagnostics.ProcessStartInfo. The following code can be found in the Launch method.
string JarFileName = GetJarFileName(ServerFolderAddress);
if (string.IsNullOrEmpty(JarFileName))
{
throw new FileNotFoundException();
}
ProcessStartInfo ServerStartInfo = new ProcessStartInfo(@"java",
"-Xmx3G -Xms2G -jar " + JarFileName + " nogui -nojline")
{
CreateNoWindow = true,
UseShellExecute = false,
RedirectStandardInput = true,
RedirectStandardOutput = true,
RedirectStandardError = true,
WorkingDirectory = ServerFolderAddress,
};
if ((ServerProcess = Process.Start(ServerStartInfo)) != null) The first line you see is GetJarFileName. What this does is search for the existence of a MineCraft server jar file in the specified directory. However, since actually identifying the contents of a jar file is quite hard, I have done it based on the existence of a jar file with one of the following names (capitalisation of first letters of words and lack of underscores is accounted for.)
- Tekkit.jar (will find tekkit.jar)
- CraftBukkit.jar (will find craftBukkit.jar, Craftbukkit.jar and craftbukkit.jar)
- Minecraft_server.jar (will find relevant permutations as seen above and likewise without underscore).
Note: The program will not allow you to use the MineCraft_server.exe file nor any launch.bat files.
The reason it doesn't? Well the .exe and .bat programs simply launch the jar file but with the correct command line arguments. I have done that in my program (basically doing what Minecraft.exe does). However, since they launch a new application, if we tried grabbing the Input/Ouput of the .exe or batch programs they wouldn't be helpful, we need the I/O of the actual Java program. Furthermore, to do this we need an extra argument passed to Java to make it work, something we couldn't do through the exe or bat programs.
So the code looks for a MineCraft server jar file, if one exists it passes back its file name (not full address name), if not is passes back null. Then a test is done to see if the jar file was found, if not throw an exception to tell the calling code (and thus user).
Next the code creates ProcessStartInfo. What this does is sets up all the arguments to pass to the file (specified by the file name/address) of the process we wish to start. It also does things like redirecting the Standard I/O streams which we need to control the server once it's started.
ProcessStartInfo accepts two parameters (in default constructor). These are: filename and arguments.
The filename is just "Java" since we just want to run the latest version of Java that is installed on the machine.
The arguments is where it gets interesting. The first argument ("-Xmx3G") specifies the maximum amount of memory Java should try and allocate to the program from RAM. 3G means 3 gigabytes and lower than this the server seems to refuse to run. The next argument is the same ("-Xms2G") but specifies the minimum amount to allocate - in this case 2 gigabytes. You can try fiddling and changing it to things like 1024M (M standing for megabytes) - notation for this is pretty simple and can be looked up easily.
The next argument ("-jar") tells Java it is a jar file we wish to open and then we specify the file name of the application to run - specifically file name not file address since we specify the working directory to start in later.
Almost we tell it to have no graphical user interface ("nogui") though this is not essential since we will specify not to create window for the process later.
Finally the most vital argument. For reasons unknown MineCraft (or perhaps it's Java itself) does not by default use the StandardOutput, StandardError or StandardInput streams, or at least it doesn't link them up. This argument is absolutely vital to make MineCraft (or Java) use them so that the program can grab the Input/Output of the server.
A final note on the exited event. While not strictly necessary it is a good way of cleaning up the process and clearing events. I also use it to set ServerRunning to false. I would recommend using this event whenever starting a process that you assume control of, as is done here.
ServerSettings class:
Please note that the class requires you to load settings before doing anything else. You cannot create settings files from scratch with it. This is a possible improvement and has been listed at the end.
The ServerSettings class provides quick easy access to the following server files:
- server.properties : The main server properties file. Technically this is a YAML file (I think) but I treat it as a file with one key/value pair per line since no properties currently use any of the other YAML structure.
- banned-players.txt : The list of usernames that are banned. Similar support could be added for banned-ips.txt but I felt banned-ips was less useful.
- white-list.txt
- ops.txt
The Serve<code>rSettings class contains an enumerable called SettingsFile - this is used to specify which settings file (excluding the server.properties file) you wish to access. This will be clearer later but I would like to say here that if you wish to extend the class to incorporate banned-ips.txt or similar then adding an option called IPBlackList would be sensible.
There are four basic operations that you can want to do to a settings file.
- Load it - Involves reading the file into memory/more use-able list or dictionary form
- Add to/edit it - Involves adding key/value pairs or just values to a dictionary/list or replacing existing values - these are very similar operations and can be done with the same syntax so I have grouped them in one.
- Remove from it - Involves deleting a key/value pair or value. While this can be done with the same for a key/value pair (set the key to
null) it can't with a list so this is a separate operation. - Save it - Involves saving the new (in memory) version to a file in the correct format.
1. Loading the settings files:
The code currently handles the four aforementioned files but the code can easily be used to load other files (as has been said). The code looks like the following and for ease of explanation I have put comments in the code otherwise it could get (I fear) confusing:
string SettingsFilePath = Path.Combine(ServerFolderAddress, "server.properties");
if (File.Exists(SettingsFilePath))
{
SettingsFileInfo = new FileInfo(SettingsFilePath);
SettingsDataString = File.ReadAllText(SettingsFileInfo.FullName);
SettingsData = SettingsDataString.Split("\r\n".ToCharArray(),
StringSplitOptions.RemoveEmptyEntries).ToDictionary(
delegate(string x)
{
if (x.Trim()[0] == '#')
{
return x;
}
else
{
return x.Split('=').First().Trim();
}
},
delegate(string x)
{
string[] SplitStrings = x.Split('=');
if (SplitStrings[0].Trim()[0] != '#' && SplitStrings.Length >= 2)
{
return SplitStrings[1].Trim().Replace("\r", "").Replace("\n", "");
}
else
{
return "";
}
});
}
else
{
throw new FileLoadException("Could not find main, required settings file!");
}
string WhiteListFilePath = Path.Combine(ServerFolderAddress, "white-list.txt");
if (File.Exists(WhiteListFilePath))
{
WhiteListFileInfo = new FileInfo(WhiteListFilePath);
WhiteListDataString = File.ReadAllText(WhiteListFileInfo.FullName);
WhiteListData = WhiteListDataString.Split("\r\n".ToCharArray(),
StringSplitOptions.RemoveEmptyEntries).ToList();
} Since the black list (banned-players list) and ops (operators) list are structured the same way as the white list (allowed players list) I have not included them in the above code sample.
2. Adding to/editing in memory settings:
The code allows two ways for adding key/value pairs to the server.properties settings and one way of adding to the other settings lists.
Methods of adding key/value pairs:
- Setting the key to a value. The code overloads the square brackets operator to allow indexing by key of the server.properties settings. You can set a key that does not exist to value or an existing key to a new value. This method uses the next method when setting a previously unset key.
Add(string key, string value) method. This is fairly self explanatory just by looking at it. It simply calls the underlying Dictionary object's Add method.
Method of adding a value:
Since the class allows adding to three different lists (black list, white list and ops list) all of which have the same format, the same method is used, you just need to specify which list. The method itself calls the relevant underlying List object's Add method. It also checks you are not trying to add duplicates and so will stop that. The method accepts to arguments, the second is the value, the first is one of the options from the previously mentioned SettingsFile enumerable - note: this argument should not be used as flags - only one will be handled.
Also possible is indexing into the different settings file using the square brackets operator. This takes two arguments, the first is (only one of) the SettingsFile enumerable options and the second is the integer index of the value in the list that you want. Errors will be thrown if index is out of range.
At this point it is worth pointing out that overloading the square brackets operator does not happen in the way you would with other operators such as +, -, /, *, etc. To overload it you simply need the following line followed by normal get/set (or just get) code:
public Type this[Type key]
public Type this[Type Option, Type key]
Note: Type can be any type you like, not just a generic type so it could be string for instance. Furthermore, each type can replaced with a different one - they don't all need to be the same.
Here follows how to do it with the <code><code>+ operator: (Clearly MSDN uses a Complex number class but it could be replaced with nay class you like.)
<pre style="padding-removed 5px; padding-removed 5px; padding-removed 5px; padding-removed 5px; margin-removed 0px; margin-removed 0px; font-family: Consolas, Courier, monospace; word-break: break-all; word-wrap: break-word; font-size: 13px; text-align: left; " lang="cs">public static Complex operator +(Complex c1, Complex c2)
{
return new Complex(c1.real + c2.real, c1.imaginary + c2.imaginary);
}
The difference is (so far as I can tell) due to the fact that square brackets are what is called Subscript operators but +, -, /, * etc. which are Unary operators (etc. also includes Binary operators). Further useful reading are the following two MSDN pages:
- http://msdn.microsoft.com/en-us/library/aa288467(v=vs.71).aspx - Operator Overloading Tutorial
- http://msdn.microsoft.com/en-us/library/5tk49fh2.aspx - Operator Overloading - Full list of operators
3. Removing from in memory settings:
I write in memory in the title of these sections because that's what it is - it would be misleading to write "Removing from settings files" since there is no file manipulation involved. If you looked at the file after calling these methods you would see no change - you must call Save to see the effects in the file.
To remove a key/value pair from the server.properties list there are again two options:
- Set the value of the key to null - this then uses the method below. Note: setting it to blank or white space will retain the key but set the value to empty or white space, only null will remove it from the list entirely. Code example:
MySettings["HelloWorld"] = null; - Call the
Remove(string key) method. This calls the underlying Dictionary object's Remove method.
To remove an item from one of the other lists, use the Remove(SettingsFile file, string value) method - works in the equivalent way to the Add method.
4. Saving in memory settings to settings files:
This process is broken down into two stages. The first stage is transferring the list (and Dictionary) data to its correct string representation. The second stage is saving that text to the relevant files.
Producing string representations:
Easy things first, creating string forms of the white list, black list and ops list is very easy. Just loop through all the values adding them with a new line after each. It is done as follows:
BlackListDataString = "";
BlackListData.ForEach(delegate(string AName)
{
BlackListDataString += AName + Environment.NewLine;
}); I chose to use LINQ for the for each method simply because it is quick, easy and compact. It has no computational gain or loss for anything we are concerned with (you may argue that speed might be compromised or improved but it really wont be noticeable in this application.) I would like to take the opportunity to talk briefly about delegate functions. This is a powerful way of writing short functions in inline code without creating a whole new method, especially if the code is only going to be used once. However, recently I have noticed some code that uses the same delegate function copied around the place. I would strongly discourage this because it results in code that is hard to update/maintain as you have lots of repeated lines. I would recommend using delegates but with a word of caution - don't copy them around the place!
On to the very mildly more complex creation of a string representation of the server.properties dictionary information. I can't say as delegates with Dictionary objects is as friendly as it is with Lists. Code far more rapidly becomes unreadable so I chose to use a proper For-Each loop here. The code is:
SettingsDataString = "";
foreach (KeyValuePair<string, string> ASetting in SettingsData)
{
if (ASetting.Key.Trim()[0] == '#')
{
SettingsDataString += ASetting.Key + Environment.NewLine;
}
else
{
SettingsDataString += ASetting.Key + "=" + ASetting.Value + Environment.NewLine;
}
} You may wonder why I chose to call Trim when testing for comments but not adding the key? Well, given how the file is supposed to be YAML, users may wish to put in very particular values (with spaces) to produce the desired result. Therefore, testing for comments uses Trim, just as MineCraft would but adding the key/value I don't because any extra spaces may well be intentional. The code is designed to be reasonably long lasting for future versions of MineCraft.
OutputEvent.cs file:
This file wraps up the necessary class and delegate for my own custom event used in the server when output is received. A good tutorial on MSDN for how to create your own events can be found at:
http://msdn.microsoft.com/en-us/library/aa645739(v=vs.71).aspx
otherwise it should simply be said that this file contains an OutputEventArgs class that contains the text that has been received from the server.
Settings Form:
The settings form can be accessed from the Main Form after a server folder has been selected. It takes one argument as its constructor and that is the address of the selected server folder. The Settings Form does not save any changes to settings file until you close it when you have the option to save or not.
What does it contain? A tab control with the following tabs:
- General - Has user-friendly controls for the main server.properties settings. This includes a numeric up down for server port; check boxes for boolean options such as PvP enabled, monsters enabled; text box for World Name (setting is level-name); drop down box for level type; text box for message of the day. The bottom of the form has a Set Values button in green - this must be clicked for the values you change to be set.
- All - Has a list box and key/value entry of settings found in server.properties file. Has set and remove buttons.
- Black List - Provides a list box, value entry box and add/remove buttons.
- White List - As with Black List.
- Ops - As with Black List.
The form code uses the ServerSettings class which has already been described. It loads all the settings when an instance of the form is created and gives the user a yes or no choice when it closes as to whether it saves any changes or not.
Main Form:
So now we get to the main form of the program, the one that links it all together.
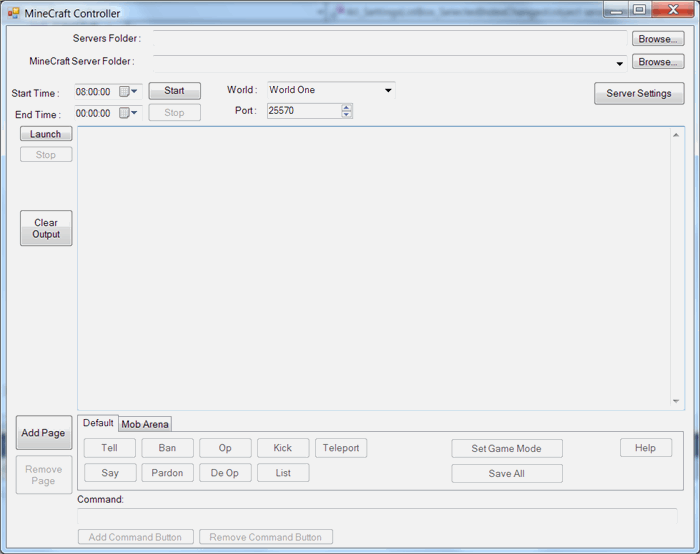
The form controls go down in a linear progression of use. They will also enable/disable when they can/can't be used. To start with you can pick a folder that contains all your MineCraft server sub folders, which will then be listed in the drop down box below. Or you can directly pick the MineCraft server folder you wish to use, skipping the above step. This is why there are two browse buttons. The program is designed to make switching between server very easy and fast. So, when you select a server to use the basic settings are loaded into the World and Port boxes. This allows you to quickly select which of the available worlds you wish to start the server running (box is a drop-down list which you can also type into so that a new world can be created). The Port number box is a numeric up down that allows quick selection of which port you want your server to run on. When you launch the server, these settings are first automatically saved to the server.properties file so the server launches with those settings. The form also obviously has the Server Settings button that open up the Settings Form. Selected Servers Folder and Server Folder addresses are saved in the registry so they are still there when you next start the program, making things a lot faster.
There is also the useful Start Time, End Time, Start and Stop buttons. These allow you to set a time after which the server should be running and a time after which it should stop. The screen shot shows these times set to 8am and midnight. The timer that checks these values (timer starts when you click the start button) ticks every 15 minutes so times are accurate to 15 minutes. This means the server could actually start at 8:15 rather than 8:00. Also, if you start the timer in the time gap that you have said you want the server running then the server will start immediately. I.e. with above settings if I start the timer at 1pm then the server will start immediately, stop at midnight then restart again 8am the next day. Finally, the times you set are also saved in the registry so when you next start up they are still there (but the program won't automatically start the timer!).
Then you have the Launch button, Stop button and Output box next to them. The Launch button allows you to start the server running, the stop button allows you to stop it running. The stop button also acts as an overriding stop button that will stop the server and also timer if the timer is running to prevent it from restarting. The output box shows all the text that normally displays in the command prompt output window. However, after sending commands to the server there is invariably an extra blank command sent so expect to see the server output (somewhere after the command) "Command not found. Use /help for the list of commands" - or words to that effect. I do not know why this is and if anyone knows and/or can fix it I would appreciate it.
Below this is the command buttons tab control and command input box. The tab control allows you to add command unlimited tabs with 12, equal sized, custom command buttons per tab. The default tab contains the standard command buttons that all MineCraft servers have (need), you can also see in the screen shot my own custom tab for commands for the MobArena plugin. To add a command button, select the tab you want to add it to (but not the default tab) then type in the command (in the command box) you want that button to be associated with. Finally, click the add command button. By typing in the exact same text to the command box you can remove the command button from your custom buttons. For commands that have additional arguments the syntax used is the same pseudo syntax used by MineCraft wiki documentation, namely:
"Command [Command Argument - Spaces allowed] [Command Argument] other command text"
e.g. "msg [Player Name] [Message]"
Spaces are allowed in the argument names. The argument names are what you are asked for when you click the button. See later explanation of the Command Arguments Form.
The tabs and buttons are saved in the registry when the program closes so don't worry about having to set them up every time you start the program. Also, the buttons are not dependent upon the server you use.
Finally, to send any command you like to the server simply type it in the command box and hit enter. This includes the stop command though I strongly recommend you do not issue the stop command through the command box as it will not be picked up by the rest of the management program.
So that's how to use the program, now onto how the code works.
Selecting servers folder and finding server folders within that:
The first thing you do is enter in the address of the folder that contains your servers' folders (or singular of this). You can also use the browse button that simply opens up a Folder Browser Dialog, pretty basic stuff. But once you've selected that the code then adds (to the Server Folder combo box) all the sub folders that contain runnable servers. You can of course select the exact folder again using a folder browser dialog. The code to discuss is how to detect if a folder is a server folder? The (core, stripped down) code looks as follows:
string[] SubDirectories = Directory.GetDirectories(ServersFolderAddressBox.Text, "*",
SearchOption.TopDirectoryOnly);
for (int i = 0; i < SubDirectories.Length; i++)
{
if (MineCraftServer.ContainsServerJarFile(SubDirectories[i]))
{
ServerFolderAddressBox.Items.Add(SubDirectories[i]);
}
} This uses the method I described in the MineCraftServer class to detect if a default MineCraft server jar file exists within the folder. If it does then the server can be used and so it adds it to the list. Classes used are in System.IO and are Directory and File classes that give quick and easy access to standard methods of file/directory handling.
Loading the server basic configuration: World and Port
To do this the code uses the ServerSettings class that has been described then loads the level-name and server-port settings into the relevant boxes. The code also does a search for folders ending in _nether. Why? Because under Bukkit MineCraft servers (including Tekkit which is built on Bukkit) it splits your world into three separate folders - one of which end sin _nether. This is, therefore, a quick and easy way of identifying worlds that are in the server's folder. It will not work for the standard MineCraft server so the list would be empty for those, however, world name is still automatically loaded from the config even if the world's folder is not found.
Other than that, most of the Main Form code is fairly boring apart from these last few items:
- Command Arguments Form
- Loading and saving of application settings using the registry
For the Command Arguments form I decided to create a form that would dynamically add text boxes and labels to its interface based on a list of names of required arguments passed to it. This provides maximum flexibility but still with lightweight code. I used the same form for adding tab pages and command button since it provided an easy way of getting user input about things such as new tab page name and new command button text.
Finally, loading and saving application settings from/to the registry. I used the registry key/sub-key structure to save tabs and there command buttons in the following format:
App Registry Key (Folder)
- Tab Page Sub Key (Folder, Name= "CommandPage_" + Tab page name)
- Command Button Key:
Key = Command + Button Number
Value = Command + "¬" + Button Text
The use of "CommandPage_" allows me to identify sub-keys that are tab pages, rather than assuming all sub keys are tab pages - this allows for more extensibility in future versions.
The code is the following for loading then saving:
List<string> CommandPagesSubKeyNames = Application.UserAppDataRegistry.GetSubKeyNames()
.Where(x => x.Split('_')[0] == "CommandPage").ToList();
foreach (string APageSubKeyName in CommandPagesSubKeyNames)
{
string PageName = "";
string[] KeyParts = APageSubKeyName.Split('_');
for(int i = 1; i < KeyParts.Length; i++)
{
PageName += KeyParts[i] + "_";
}
PageName = PageName.Remove(PageName.Length - 1);
TabPage NewPage = new TabPage(PageName);
CommandsTabControl.TabPages.Add(NewPage);
Microsoft.Win32.RegistryKey CommandPageSubKey = Application.UserAppDataRegistry.OpenSubKey(APageSubKeyName);
string[] KeyNames = CommandPageSubKey.GetValueNames();
for (int i = 0; i < KeyNames.Length; i++)
{
Button NewCommandButton = new Button();
string Val = (string)CommandPageSubKey.GetValue(KeyNames[i]);
NewCommandButton.Text = Val.Split('¬')[1];
Commands.Add(Val.Split('¬')[0], NewCommandButton);
NewPage.Controls.Add(NewCommandButton);
}
}
List<string> CommandPagesSubKeyNames = Application.UserAppDataRegistry.GetSubKeyNames().Where(
x => x.Split('_')[0] == "CommandPage").ToList();
foreach (string APageSubKeyName in CommandPagesSubKeyNames)
{
Application.UserAppDataRegistry.DeleteSubKeyTree(APageSubKeyName, false);
}
foreach(TabPage ACommandPage in CommandsTabControl.TabPages)
{
if (ACommandPage.Text != "Default")
{
Microsoft.Win32.RegistryKey ThisPageKey = Application.UserAppDataRegistry.CreateSubKey(
"CommandPage_" + ACommandPage.Text);
int i = 0;
foreach (Button ACommandButton in ACommandPage.Controls)
{
string ACommand = (from Comds in Commands
where (Comds.Value == ACommandButton)
select Comds.Key).First();
ThisPageKey.SetValue("CommandButton" + (i++).ToString(),
ACommand + "¬" + ACommandButton.Text);
}
}
} Possible Improvements
- Searching for worlds based on folder contents not name
- Prevent extra blank command being sent after sending a command.
- Allow user selection of MineCraft server jar file other than one with default name
- Allow user selection of the amount of memory to allocate
- Following from 2 - try and get a 32-bit version of the program working
- Possibly allow
SettingsFile enumerable to be used as flags so that adding to multiple lists at once can be done. - Modify code of
ServerSettings class to allow it to be used for creating new settings files from scrath. - Plug-ins Manager : Editing plug-ins' config.yml files, Install/Uninstall plug-ins
Points of Interest
The main weird and slightly frustrating thing learnt was the MineCraft (or Java) quirk that requires the "-nojline" argument to fix.
Also interesting is that 32-bit machines can only allocate up to 4G of physical memory at any given time, hence why the program needs to be compiled to 64-bit. To get a 32-bit version working I would need to experiment with how little memory MineCraft servers actually need/will accept.
Useful Links
History
7/4/12 - Initial release
This member has not yet provided a Biography. Assume it's interesting and varied, and probably something to do with programming.


