Introduction
To design and manage effective business solutions, Office InfoPath Form services offer you rich, dynamic forms that facilitate your team to gather, share, and reuse information within a network. A form is simply a container that holds all the elements and controls that accept user input which is then saved in a local or server location. These forms can be sent as an email or viewed on the browser so that organization-wide collaboration and decision-making gets improved in less time.
While designing forms, developers have the great task of maintaining integrity in data the forms intend to collect from the users. Office InfoPath 2007 has carefully taken this issue upfront and come up with tools to create and maintain integrity checks within forms.
Integrity made simple
Forcing the user to input valid data is surely a responsibility of the developer. When the user is allowed to input data in a form element, as a developer, the biggest worry you have in your mind is how to ensure the correctness of data. InfoPath lets you provide three ways of ensuring the accuracy of user input, and they are: Default values, Validations, and Rules.
Default values are just a simple way of telling the user what to enter in a form element. The developer himself supplies the initial value so that the user is properly guided to enter his own value.
Validations are an effective way of controlling user input, with some logic. Providing validations ensure the correctness of data in a business context. For instance, when a user is filling details in a Travel Request form, input to the Request Date box is not just a date in correct format, but it should also meet certain conditions; Request Date should not be later than the Departure Date. Validation checks also allow you to specify the action that should take place when the data is invalid.
Rules imply a set of business conditions that are broader and significant in scope at the application level. These rules comprise a stripe of logic between the elements and controls in a form. You can use rules to display messages, set values, and apply other actions based on conditions in the form. Any number of rules can be defined for a single element, and are applied in the order specified.
Here is a sample InfoPath form for filling travel request details. In the design mode, it appears as shown below:
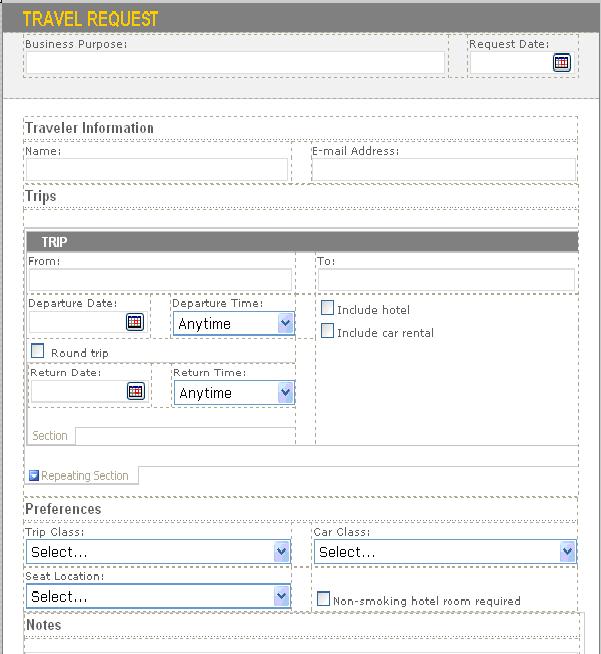
Figure 1: A sample InfoPath Form
In the properties dialog of any control, you can specify the default values, validations, and rules.

Figure 2: Properties dialog of a form element
As you see in Figure 2, today() has been set as the default value for the requestDate field. To enter a default value, click on the fx button on the right side. In the Formula box, you can enter a value, insert a field or group, or insert a function. Then, click on the OK button. See Figure 3.
Figure 3: Specifying a default value
To provide a validation check to a control, click on the Data Validation button in the dialog as shown in Figure 2. In the Data Validation dialog, you specify a condition, a tool tip string that appears when the user hovers with his mouse on the control, and the message to display when the user inputs invalid data. Figure 4 shows how to define a validation condition for the requestDate field.
Figure 4: Defining a validation check for the requestDate field
To define a rule, in the properties dialog (Figure 2) of the departureDate field, click on the Rules… button. On adding a new rule, a Rule dialog appears as shown in Figure 5. Specify the name of the rule and click on the Set Condition button to specify a condition on which this rule might apply.
Figure 5: Defining a rule for the departureDate field
Next, you add actions that need to be performed when the rule is implemented.
Figure 6: Defining an action for the departureDate field
Actions are found in the drop-down list as shown in Figure 7.
Figure 7: List of Actions
How to use the Logic Inspector?
Logic Inspector is a new feature in InfoPath 2007, and is available from the Tools menu. Having defined default values, validations, and rules in your form, the next thing you do is to use the Logic Inspector to examine relationships and dependencies that exist within a form. This would be a more organized and systematic approach to forms development.
Logic Inspector displays all kinds of integrity constraints you define in a form in the tree structure. Data validation, Calculated default values, Rules, and any programming script that controls the user input are the root nodes, and collapsing each one of them gives you the relevant details.
Figure 8 shows the Logic Inspector results for the Travel Request Form we discussed earlier in this article.
Figure 8: Logic Inspector for Travel Request Form
As you see in the figure, the Logic Inspector has two panels. One is on the left listing all the integrity-check items. On clicking a particular field, the panel on the right appears. From the information on the right panel, you could understand how fields are inter-related and dependent on each other. The relationship details are classified into three categories.
- Logic that depends on the value in this field or group
When you click on the departureDate field in the right panel, all dependencies of this field (Validations, Default values, and Rules) with respect to other fields are shown as in Figure 8. Dependencies with no participation from other fields are not listed. Please note that the Calculated Default values node has a “None” entry. Since the returnDate depends on the value in the departureDate field, it is listed in the Validation and Rules node.
Figure 9: Logic Inspector displaying fields involved in Dependency
- Logic that is triggered by a change in this field or group
Whenever there is a change in the value of the departureDate field, not only is the validation and rule specified for the field is applied, but the value of the requestDate field is also checked. The validation and rules defined for the requestDate field are also triggered. This relationship is displayed as shown in Figure 9.
Figure 10: Logic Inspector displaying fields involved in Triggering effect
- Logic that may change this field or group.
This category of information displays the values assigned to a field that changes the value of the field, with no user interaction. In the Figure 10, you can see the default values that change the value of the returnDate field.
Figure 11: Default values for a field
Conclusion
When you develop complex forms, you might often get into much more complex interlacing of data relationships and field dependencies. With Logic Inspector, you can provide an assured support for data accuracy and integrity in your forms.
This member has not yet provided a Biography. Assume it's interesting and varied, and probably something to do with programming.


