Introduction
In this article, I will explain how to install and configure self-signed SSL certificate for the central administration web site in SharePoint Server 2010. This procedure is also applicable for any other web applications for both SharePoint 2007 and SharePoint 2010.
Follow the steps below to configure SSL certificate for central administration web site:
Create Self-Signed SSL Certificate
- Log into the web server by using the SharePoint Set up account.
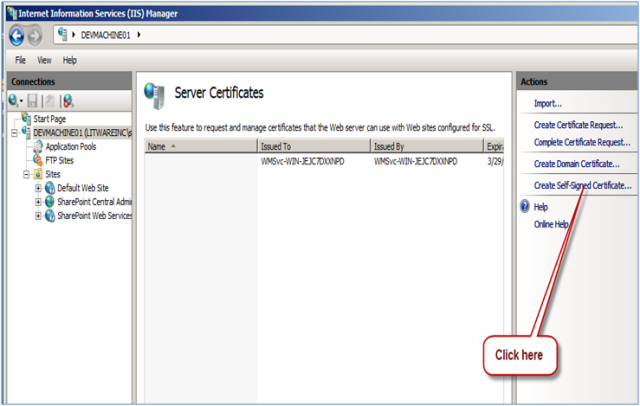
- Open IIS Manager. Click on the IIS Server and then double click Server Certificates.
- Click Create Self-Signed Certificate link as shown in the figure below:
- Enter the name of the SSL certificate that you want to associate with the central administration web site.

- SSL certificate is created.
Bind Self-Signed SSL Certificate with the Central Administration Web Site
- Right-click Central Administration web site. On the context menu, click Edit Bindings.
- A windows dialogue box will appear.
- Click Add to create a new binding for central administration web site.
- On the Add Site Binding window, select https from the Type dropdown and select SSL certificate from SSL certificate dropdown. Click OK to save changes.
- Click Remove button to remove default http binding as shown in the figure below:
- Now we have only https binding left for the central administration web site.
Update SSL Settings for the Central Administration Web Site
- Select SharePoint Central Administration v4. Double-click SSL Settings to open SSL Settings page.
- Configure the following options and click Apply to save settings.
- Require SSL (checked)
- Require 128-bit SSL (checked)
- Client certificate: Ignore (selected)
Execute STSADM Command to Update Registry Settings on the SharePoint Farm
- Open command prompt and execute the following statement:
STSADM -o setadminport -port 443 -ssl
- Now open SharePoint Central Administration Website.
- As you see in the screenshot above, Internet Explorer is showing SSL certificate error. Now to browse to alternate access mapping page and specify fully qualified domain name for the central administration web site. i.e.
ServerName.DomainName. Once the alternate access mapping settings are updated, close your browser and open the central administration web site again.
I do hope that you will find this article useful, when using SSL certificate for the SharePoint web applications. Please leave your valuable comments.
History
- 25th April, 2010: Initial post
Adnan Ahmed is SharePoint Architect in Version 1(http://www.version1.com), the IT Consulting Company in Ireland and has involved with many large enterprises to help them realise real benefits of SharePoint 2007|2010.
SharePoint Architect | Blogger | IT Evangelist | MCPD SharePoint 2010 Developer| MCITP SharePoint Administrator 2010
Email: adnan.ahmed@live.ie
Owner: http://www.mossgurus.com
http://www.sp-blogs.com
Linked In Profile: http://www.linkedin.com/in/syedadnanahmed
My Blogs:
http://www.sp-blogs.com/blogs/adnan


