Introduction
Generally, most of the cloud applications are used to connect database like SQL Azure. But some clients may want to use their own database servers because of their concerns on data security. In this example, we can establish the local database connection from our own systems with cloud application. Here we need the internet connection and Azure subscription to proceed further.
The following steps need to be performed to complete this example:
Step 1: Get ready with local database setup
Step 2: Configure and Enable TCP port 4133 for SQL Server
Step 3: Add local machine to Azure Connect
Step 4: Create a cloud project with a Web Role and add code for SQL Server connection testing
Step 5: Add a Role to Azure Connect
Step 6: Publish the project
Step 7: Establish the Connect Group
Step 8: Test the Azure Local SQL Server Connection with Azure Role Instance
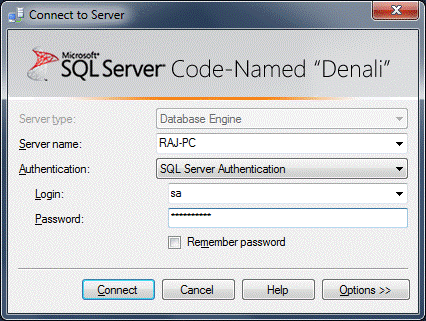
Step 1: Get Ready with Local Database Setup
We can use any SQL Server Express edition. In this example, I am using "Denali Express Edition ", with the server name 'Raj-PC'. The server name can be anything as per your software setup, if it having the default instance with Express Edition, it can be like <ServerName>/SQLEXPRESS.
The table "emp" has some sample data with two columns, empno and ename.

Step 2: Configure and Enable TCP Port 4133 for SQL Server
Verify the SQL Server configuration by right clicking on SQL Server and selecting properties. Server authentication must be mixed mode and it should allow remote connections.
Go to SQL Server Configuration Manager and enable TCP/IP protocol.
Double click on TCP/IP and set / verify the port 1433 under "IP All" section and restart the Server Instance.
Now add the new firewall rule for TCP port 1433 in Windows Firewall settings. Go to Control Panel --> Windows Firewall --> Click on Advance Settings. For this shortcut is Start --> Run --> wf.msc.
Under Inbound Rules section, click on New Rule link and select Rule Type as Port.
From Protocols and Ports, select TCP and enter 1433 as a port number.
Keep the default settings for Action and Profile sections and finally enter the Name for the new rule and finish the wizard.
Step 3: Add Local Machine to Azure Connect
Note: Currently this feature is available only as part of the beta programs; "Windows Azure connect", and we should request this feature to get approval.
Connect to the Windows Azure portal https://windows.azure.com with your windows live Id (which has the subscription), and from Virtual Network section, select subscription id and click on "Install Local Endpoint" button from the top menu.
From the popup screen, copy the URL to clipboard and paste it on new web browser windows. It starts installing the software.
After successful installation, we can notice an icon "Windows Azure Connect" in a windows taskbar.
Verify the Azure portal for Activated Endpoints.
Step 4: Create a Cloud Project with a Web Role and Add Code for SQL Server Connection Testing
Create a cloud project using Visual Studio 2010 and add some piece of code for local SQL Server connection. Here we can display the data using Gridview control from a Default.aspx page. For our convenience, add the connection string and query directly in the code.
Default.aspx.cs:
string cnstr = "Data Source=Raj-PC, 1433;Initial Catalog=rsdb;
Persist Security Info=True;User Id=sa;Password=mypassword;
MultipleActiveResultSets=True;";
SqlConnection cn = new SqlConnection(cnstr);
SqlCommand cmd = new SqlCommand("select empno, ename from emp", cn);
cn.Open();
SqlDataReader dr = cmd.ExecuteReader(CommandBehavior.CloseConnection);
grdView.DataSource = dr;
grdView.DataBind();
...
Step 5: Add a Role to Azure Connect
Click on "Get Activation Token" of Groups and Roles from Azure portal and copy the token to clipboard.
Go back to Visual Studio cloud project, select WebR<code>ole1 Properties. From Virtual Network tab, paste the above copied activation token.
Step 6: Publish the Project
Publish the cloud project into Azure platform and verify the WebRole1 instance created under Connect Azure. This can be done by creating packages of the project and deploy under the hosted services of Azure portal. Please refer any of the article, example: Create and Deploy Windows Azure Application to know how to publish the cloud project.
Step 7: Establish the Connect Group
Select Groups and Roles of Azure connect and click on "Create Group" button from the top menu.
In the popup screen, enter the group name and select Endpoint and Azure Role and click on Finish button.
Now we can notice Connect Group is created under webrole1 in the Azure portal. And also we can verify the status of the "Windows Azure Connect" icon from taskbar.
Step 8: Test the Azure Local SQL Server Connection with Azure Role Instance
Copy the published cloud project DNS URL from Azure portal and run the application.
Reference
Referred the article from MSDN.
History
- 27th September, 2011: Initial draft
This member doesn't quite have enough reputation to be able to display their biography and homepage.


